Hello friends welcome to moneyorbis.com. In this article we will learn about How to Open Demat Account in Dhan | Dhan Demat Account Openning Step By Step Guide. Opening Account in Dhan is very easy. lets Gets Started.
Table of Contents
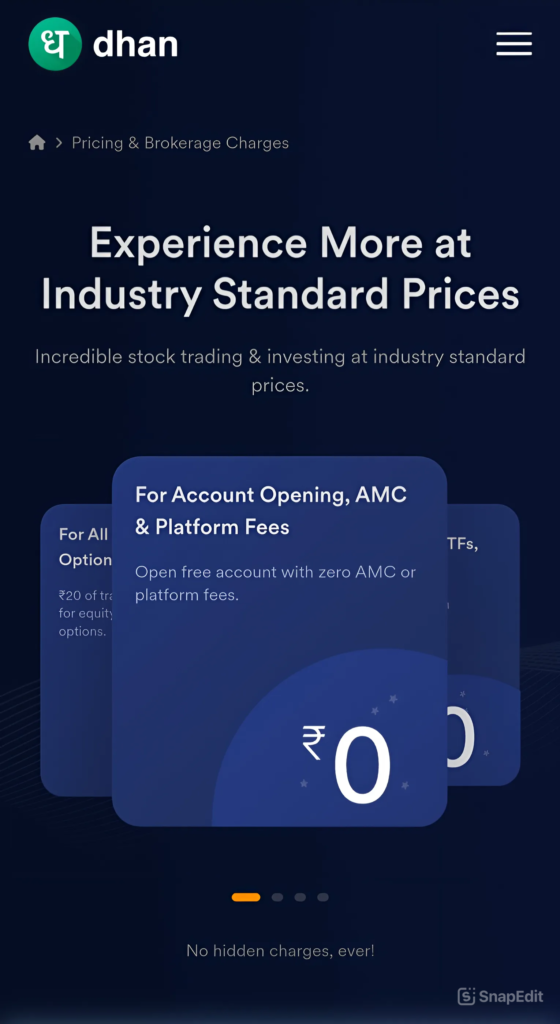
Dhan Pricing and Dhan Brokerage Charges.
How to Open Demat Account in Dhan | Dhan Demat Account Openning Step By Step.
Opening an account with Dhan , a popular Indian Stock Market Broker, usually involves a few straightforward steps. Here is a general guide on how to do it:
- Step:-1 Press Below Botton and Select Trading or Investing.
- Step:-2 Install and Open Dhan App.
- Step:-3 Enter Your Mobile Number and Click on “Proceed Ahead“.
- Step:-4 Enter “OTP” (One Time Password) Arrived on Your Given Mobile Number.
- Step:-5 Add Your Email Address.
- Step:-6 Verify Your Email Address.
- Step:-7 Enter and Set Pin For Your Account.
- Step:-8 Set up Face ID for Dhan.
- Step:-9 Enter your PAN Card Details.
- Step:-10 Check and Verify your PAN Details.
- Step:-11 Verify your Aadhaar.
- Step:-12 Enter your Aadhaar Number.
- Step:-13 Verify Aadhaar OTP.
- Step:-14 Enter ot Create 6 Digit Sequrity Pin for Digilocker.
- Step:-15 Please provide your consent to share the following with Moneylicious Securities Dhan.
- Step:-16 Add your Details.
- Step:-17 Add Personal Information.
- Step:-18 Capture your Photo.
- Step:-19 Draw or Upload Signature as on PAN Card.
- Step:-20 Declerations for Account.
- Step:-21 Trade Responsibly in Futures & Options.
- Step:-22 Upload Bank Statement Last 6 Months.
- Step:-23 Upload Bank Statement Last 6 Months.
- Step:-24 Link your Bank Account.
- Step:-25 Bank Account is Verified.
- Step:-26 eSign with Aadhaar.
- Step:-27 eSign with Aadhaar.
- Step:-28 eSign with Aadhaar.
- Step:-29 Enter Aadhaar OTP.
- Step:-30 Document Signed.
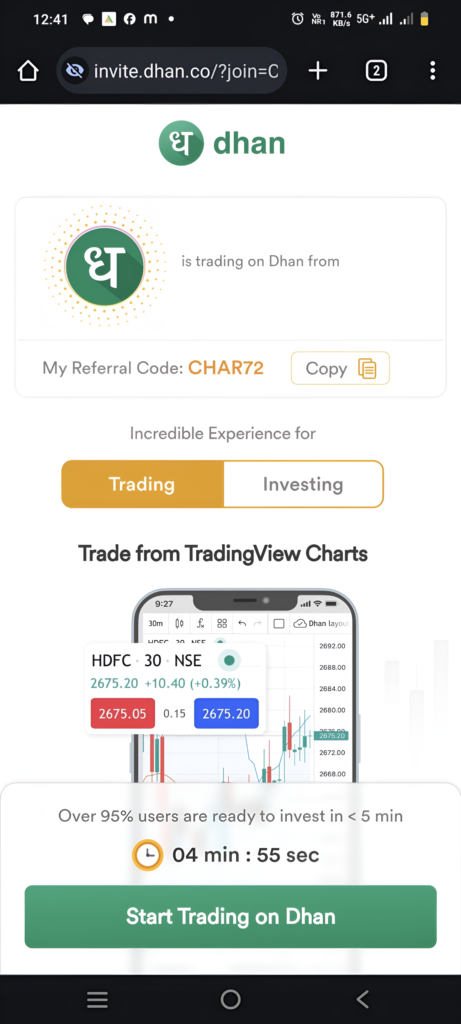
Step:-1 Press Below Botton and Select Trading or Investing.
- After Press “Start Trading on Dhan“.
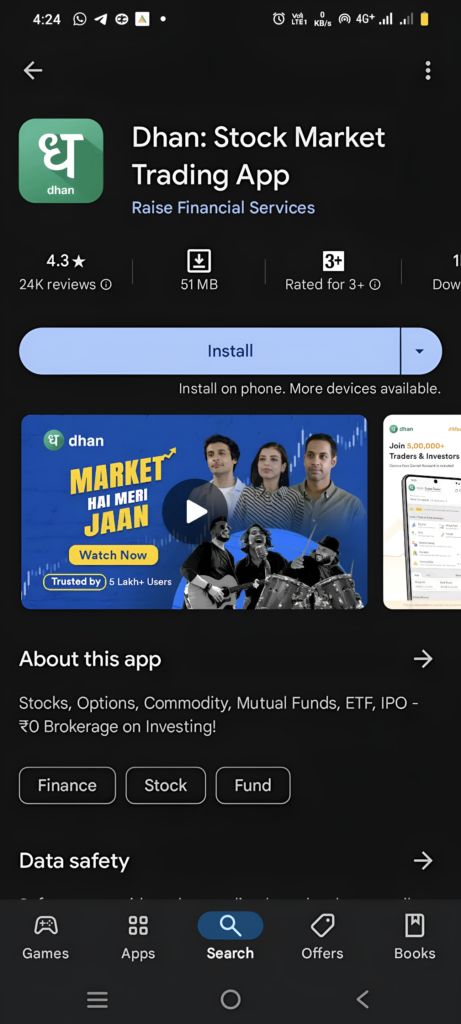
Step:-2 Install and Open Dhan App.
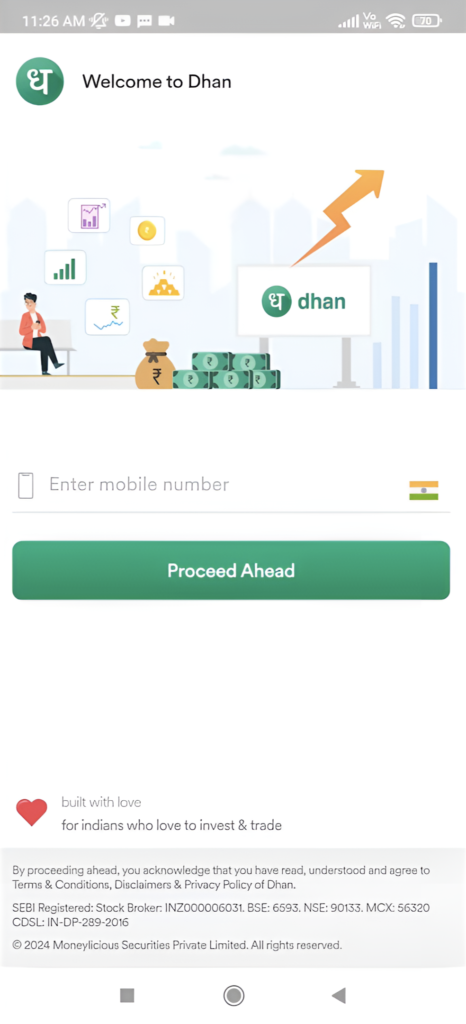
Step:-3 Enter Your Mobile Number and Click on “Proceed Ahead“.
- Enter Your Adhar Linked Mobile Nomber.
- After Press “Proceed Ahead“.
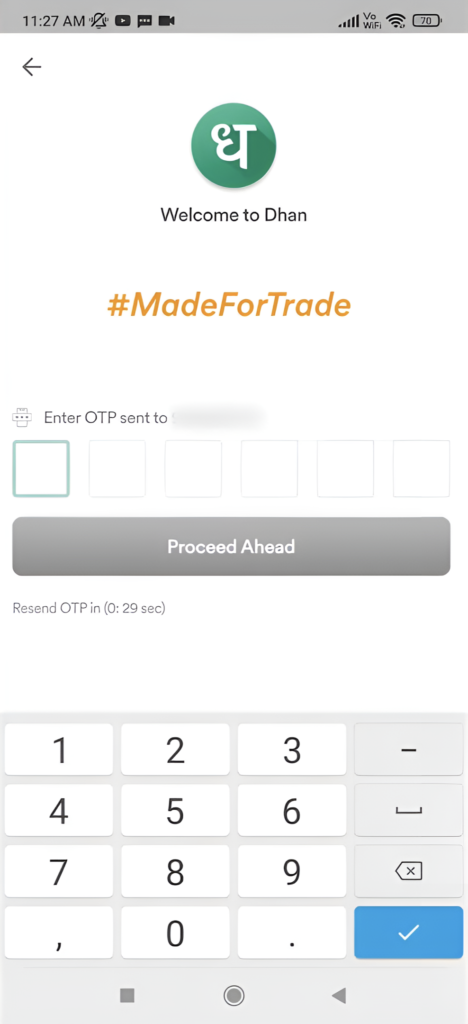
Step:-4 Enter “OTP” (One Time Password) Arrived on Your Given Mobile Number.
- Enter “OTP”.
- After Press “Proceed Ahead“.
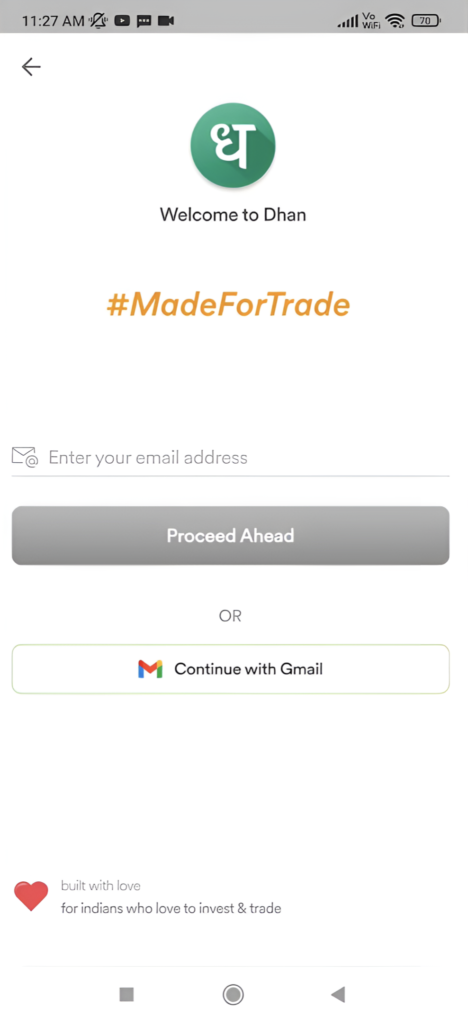
Step:-5 Add Your Email Address.
- Recommended to Press “Continue With Gmail” Button For Easy and Fast Process. If you want to add your Email Adress Manually than Enter your Email Adress and Press “Proceed Ahead“.
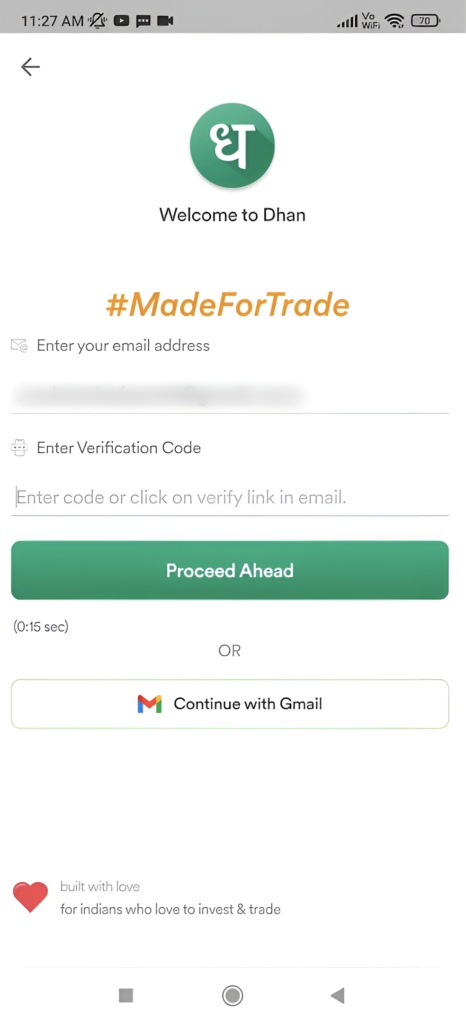
Step:-6 Verify Your Email Address.
- Recommended to Press “Continue With Gmail” Button For Easy and Fast Process.
- Enter Your Email Verification Code and After Press “Proceed Ahead“.
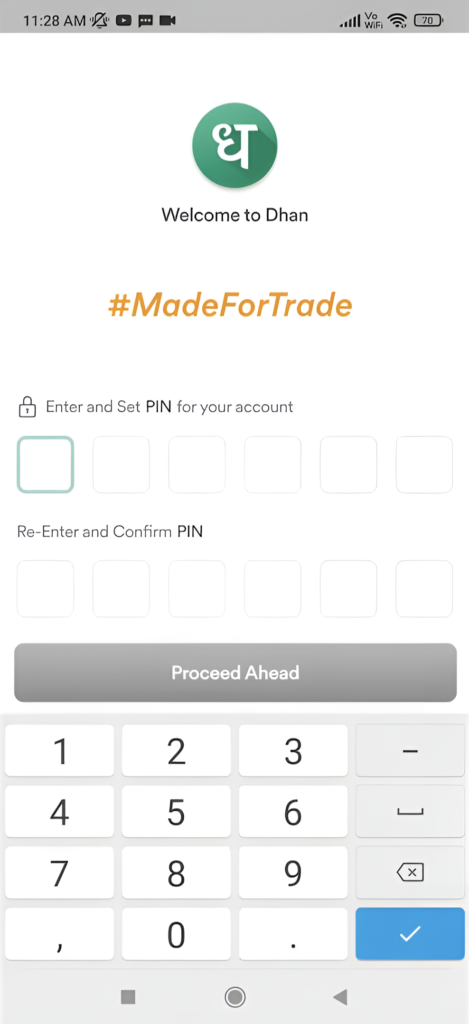
Step:-7 Enter and Set Pin For Your Account.
- Enter and Set Pin For your Account.
- Re-Enter and Confirm Pin For your Account.
- After Press “Proceed Ahead“.
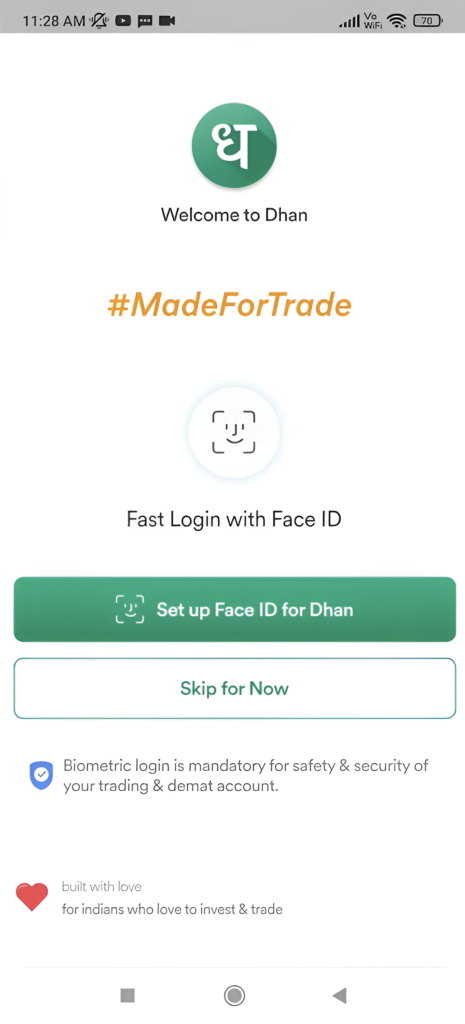
Step:-8 Set up Face ID for Dhan.
- Set up Face ID for Dhan.
- Or Press “Skip for Now”.
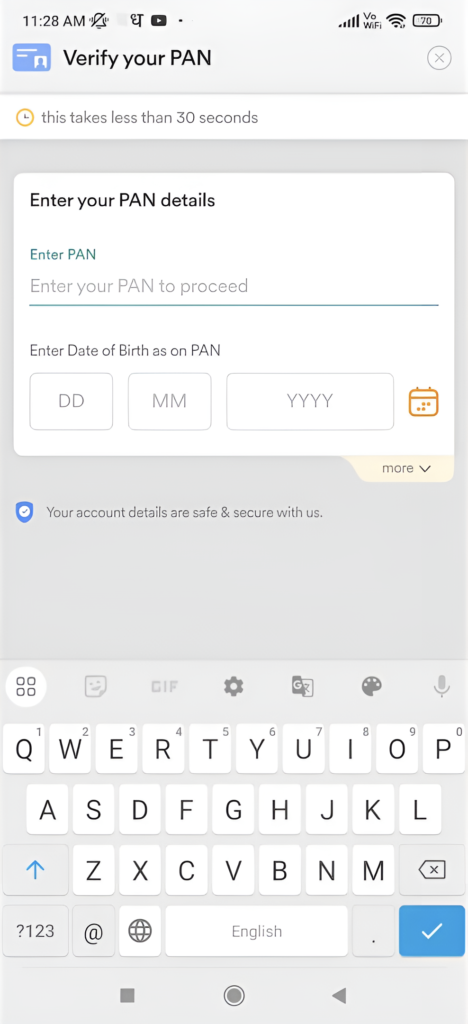
Step:-9 Enter your PAN Card Details.
- Enter your PAN Details.
- Enter Date of Birth as on PAN.
- After Press “Proceed Ahead“.
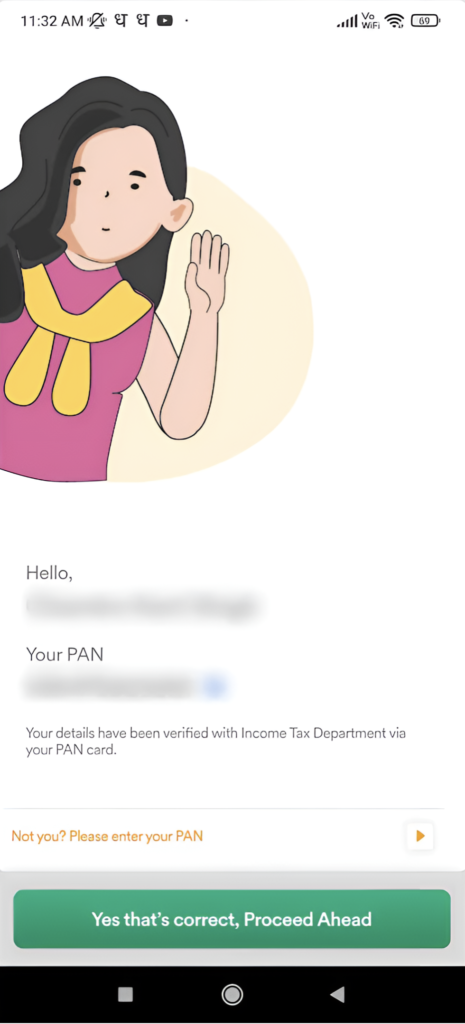
Step:-10 Check and Verify your PAN Details.
- Check and Verify your PAN Details.
- After Press “Yes thats correct, Proceed Ahead“.
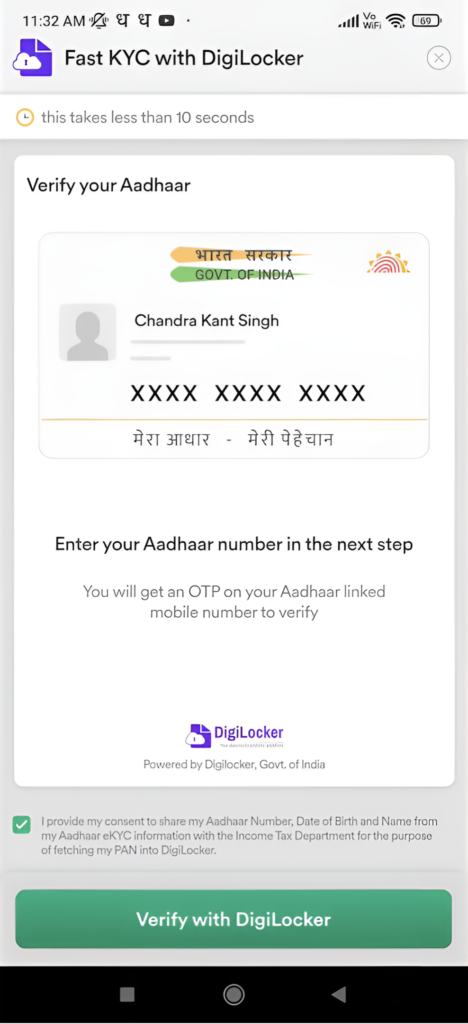
Step:-11 Verify your Aadhaar.
- Click on Checkbox.
- After Press “Verify with DigioLocker”.
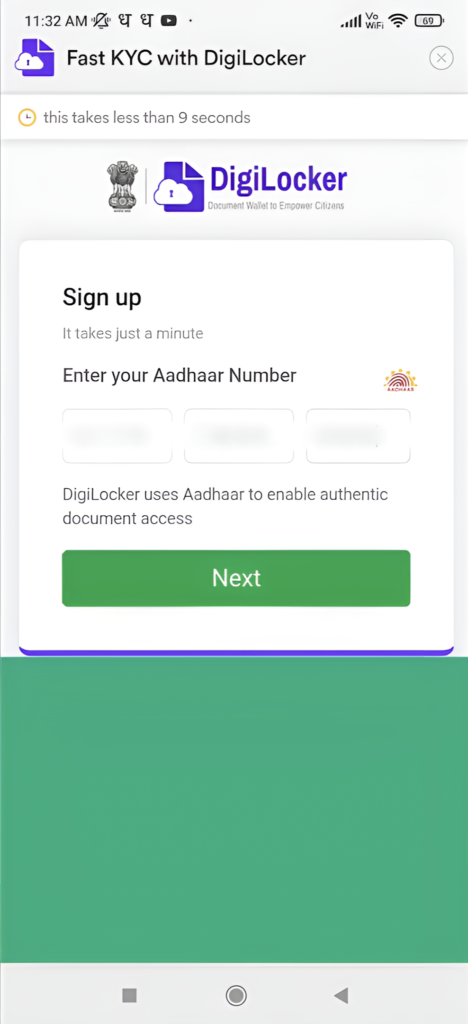
Step:-12 Enter your Aadhaar Number.
- Enter your Aadhaar Number.
- After Press “Next”.
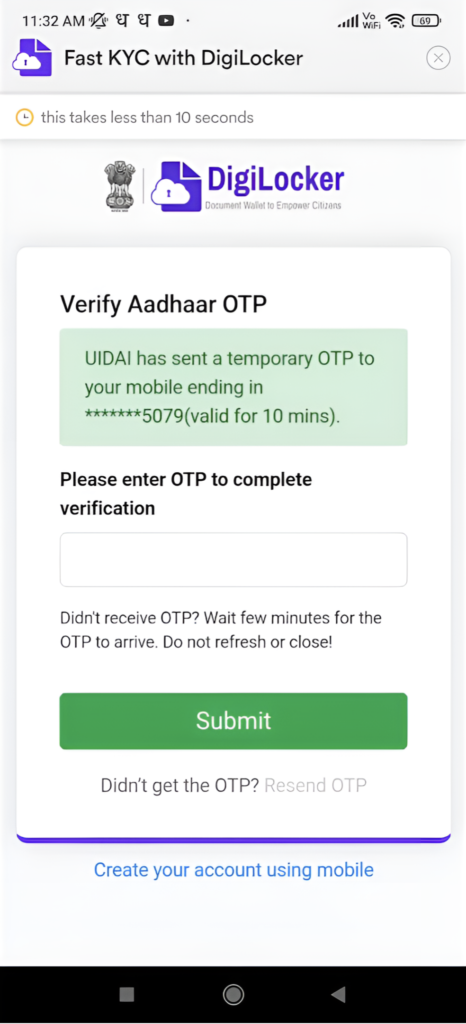
Step:-13 Verify Aadhaar OTP.
- Verify Aadhaar OTP.
- After Press “Submit”.
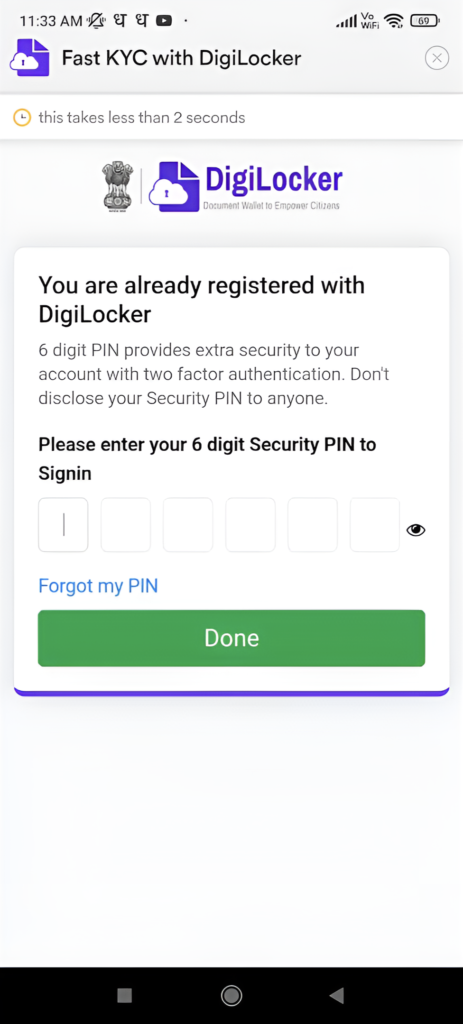
Step:-14 Enter ot Create 6 Digit Sequrity Pin for Digilocker.
- Enter ot Create 6 Digit Sequrity Pin for Digilocker.
- After Press “Done”.
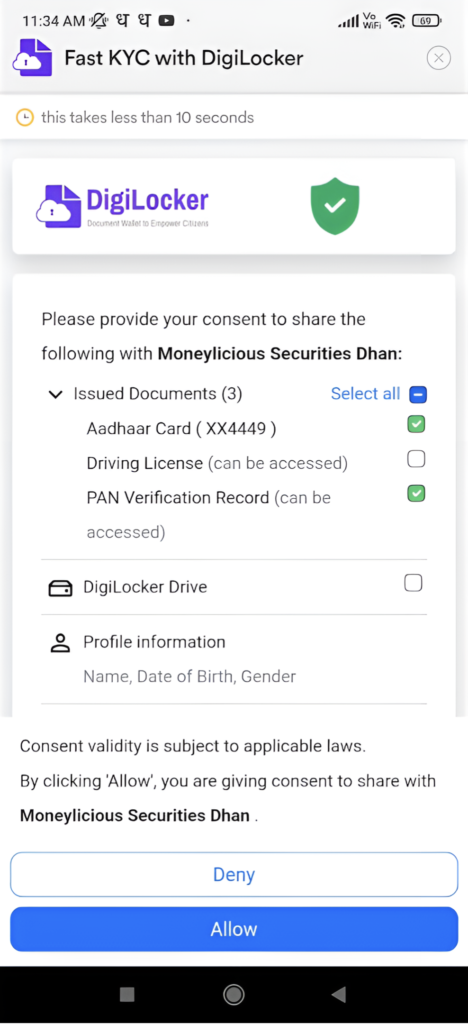
Step:-15 Please provide your consent to share the following with Moneylicious Securities Dhan.
- After Press “Allow”.
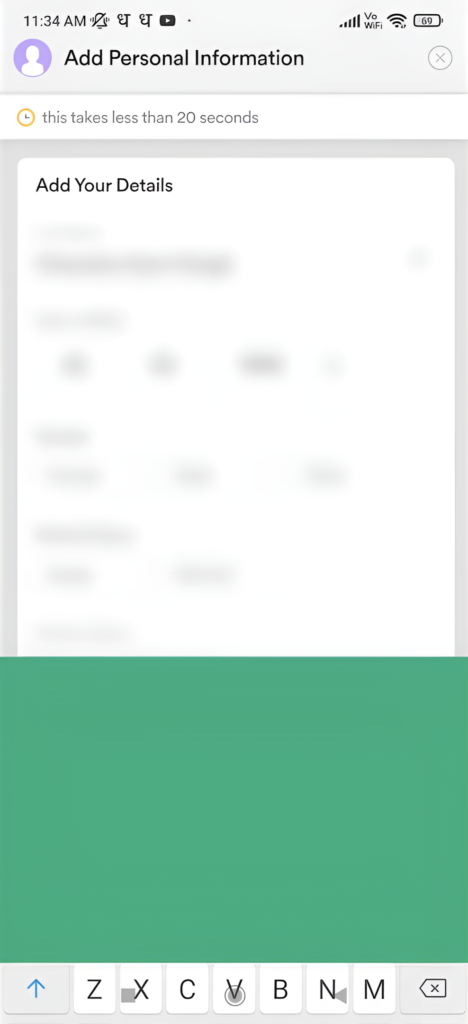
Step:-16 Add your Details.
- Add your Details.
- After Press “Proceed Ahead“.
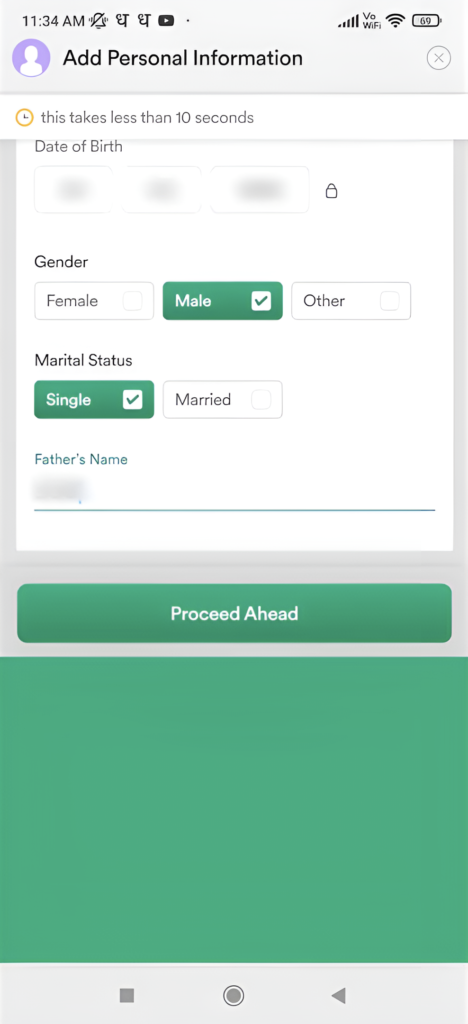
Step:-17 Add Personal Information.
- Add Personal Information.
- After Press “Proceed Ahead“.
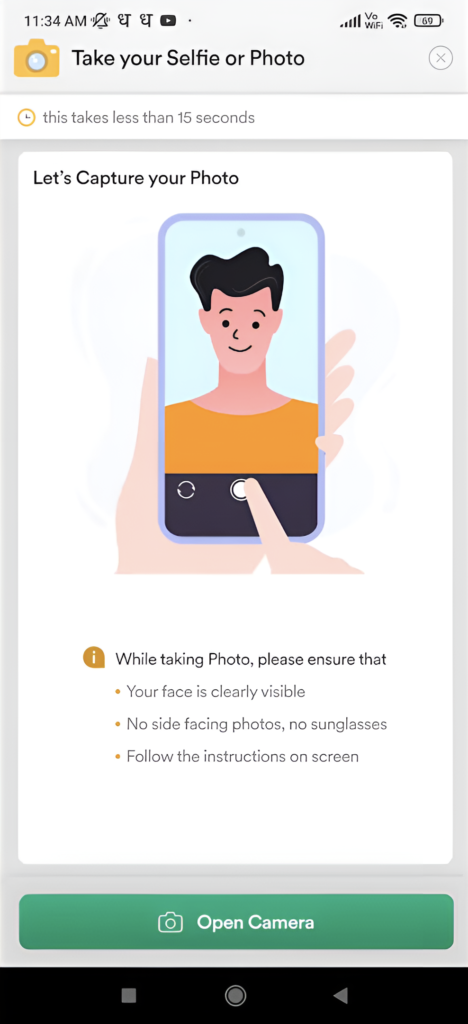
Step:-18 Capture your Photo.
While taking Photo, please ensure that:
- Your face is clearly visible
- No side facing photos, no sunglasses
- Press “Open Camera”.
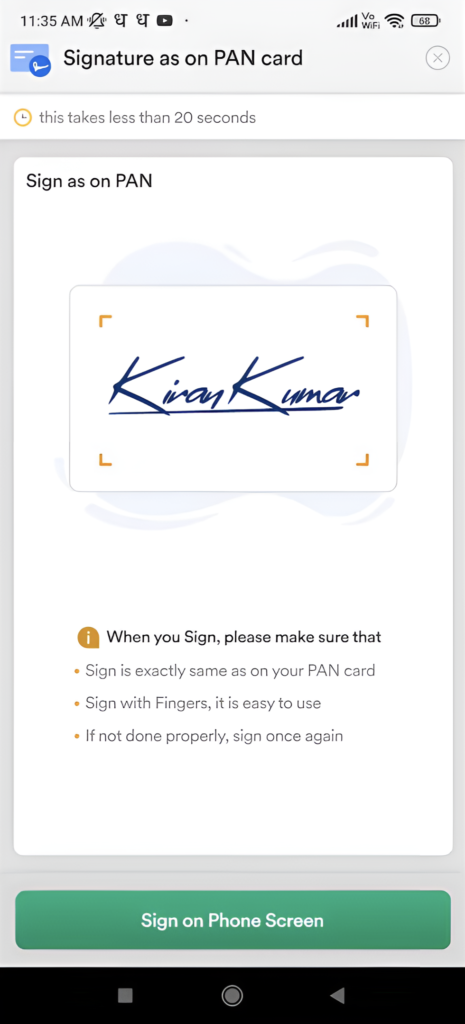
Step:-19 Draw or Upload Signature as on PAN Card.
When you Sign, please make sure that:
- Sign is exactly same as on your PAN card.
- Sign with Fingers, it is easy to use.
- If not done properly, sign once again.
- Press “Sign on Phone Screen”.
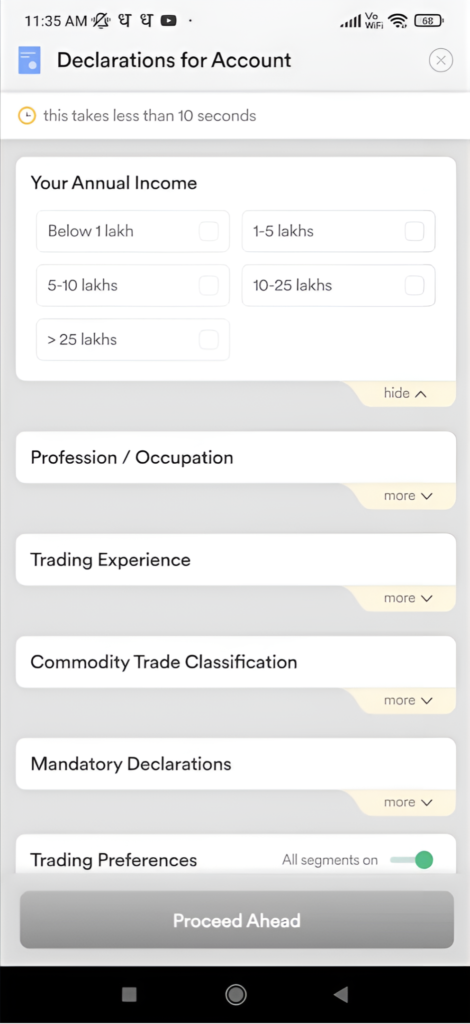
Step:-20 Declerations for Account.
- Declerations for Account.
- Select According to you.
- After Press “Proceed Ahead“.
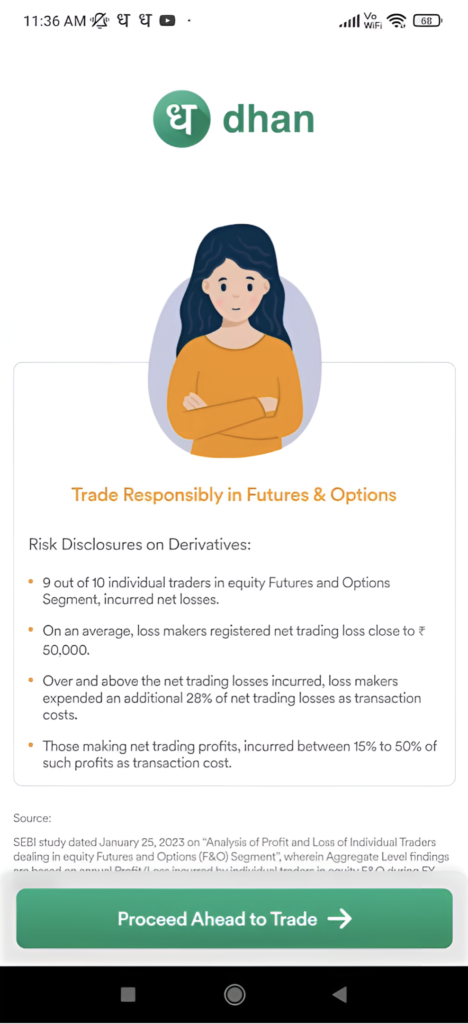
Step:-21 Trade Responsibly in Futures & Options.
Risk Disclosures on Derivatives:
- 9 out of 10 individual traders in equity Futures and Options Segment, incurred net losses.
- On an average, loss makers registered net trading loss close to 50,000.
- Over and above the net trading losses incurred, loss makers expended an additional 28% of net trading losses as transaction costs.
- Those making net trading profits, incurred between 15% to 50% of such profits as transaction cost.
- After Press “Proceed Ahead to Trade”.
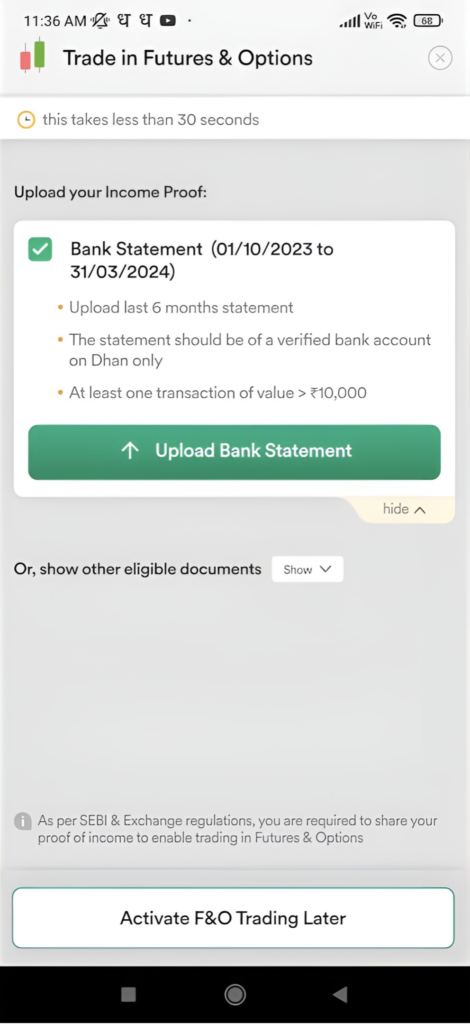
Step:-22 Upload Bank Statement Last 6 Months.
- Press “Upload Bank Statement“.
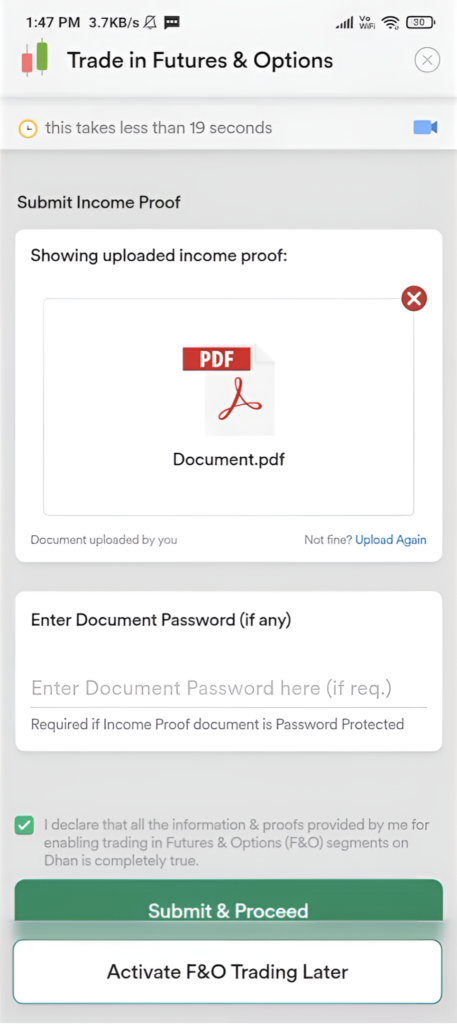
Step:-23 Upload Bank Statement Last 6 Months.
- Upload Bank Statement
- Enter Document Password (if any)
- After Press “Submit and Proceed“.
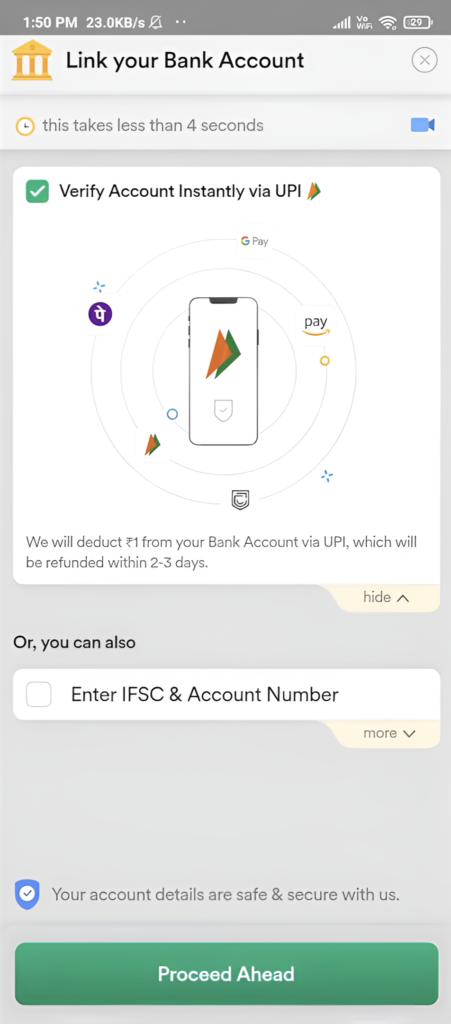
Step:-24 Link your Bank Account.
- Recommended Verify with UPI for Easy and Fast Process.
- Or Add Your Account Details Manually.
- After Press “Proceed Ahead”.
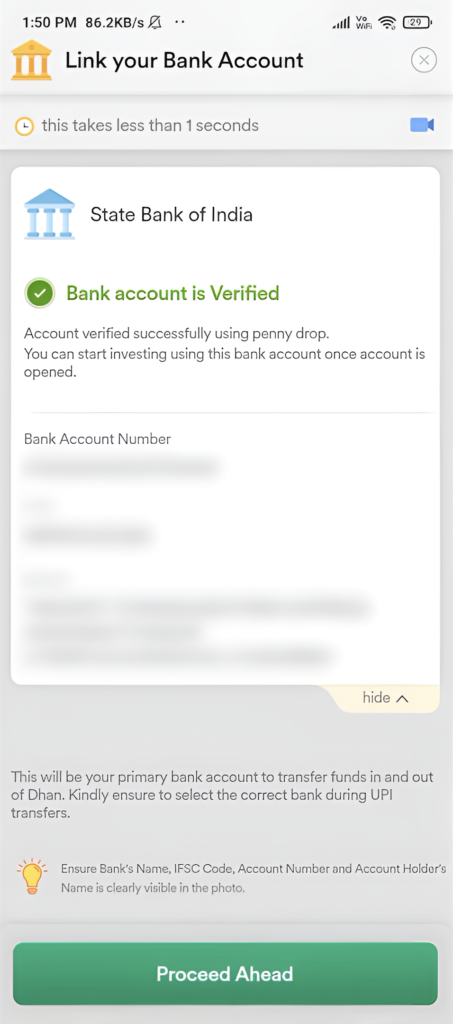
Step:-25 Bank Account is Verified.
- Bank Account is Verified.
- After Press “Proceed Ahead”.
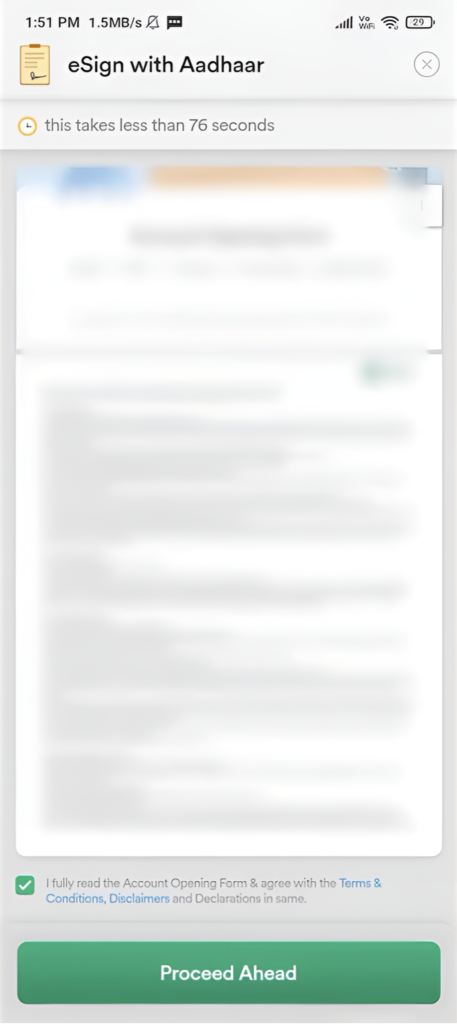
Step:-26 eSign with Aadhaar.
- Tick on Checkbox
- After Press “Proceed Ahead”.
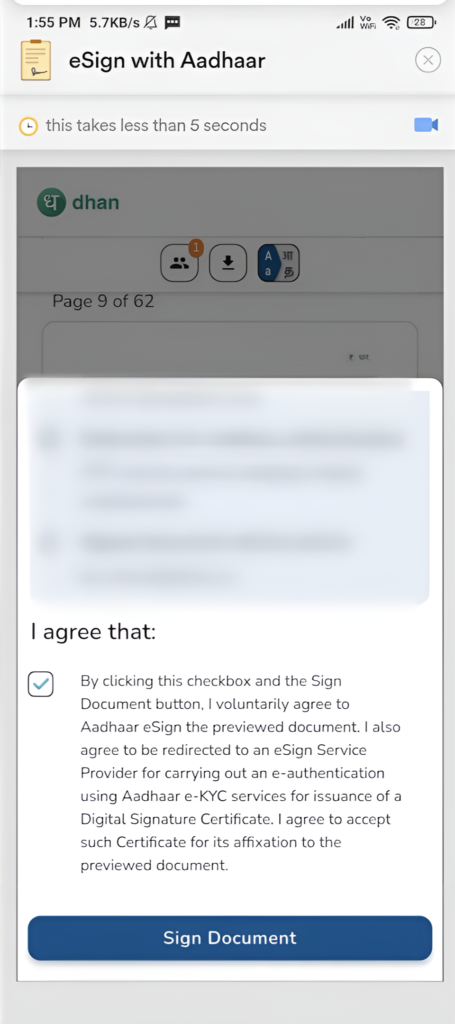
Step:-27 eSign with Aadhaar.
- Tick on Checkbox
- After Press “Sign Document”.
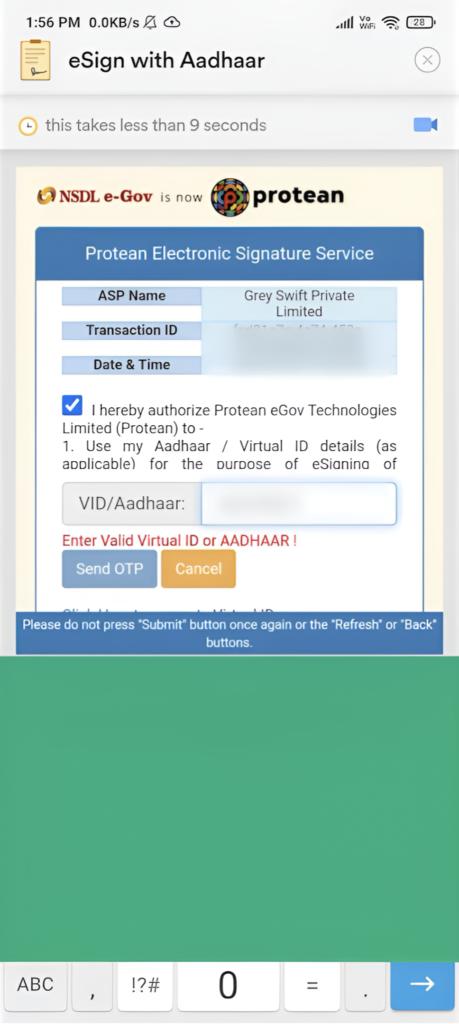
Step:-28 eSign with Aadhaar.
- Tick on Checkbox
- Enter your Virtual ID or Aadhaar Number.
- After Press “Send OTP”.
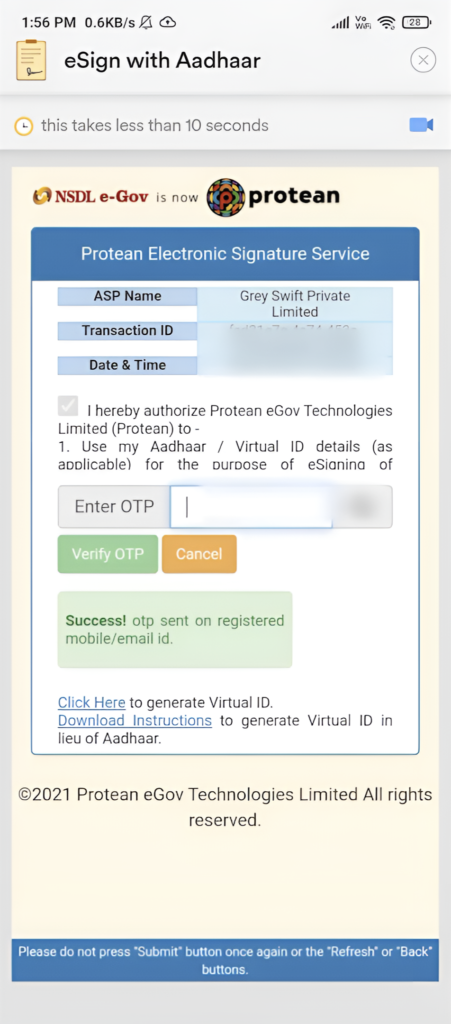
Step:-29 Enter Aadhaar OTP.
- Enter your Aadhaar OTP.
- After Press “Verify OTP”.
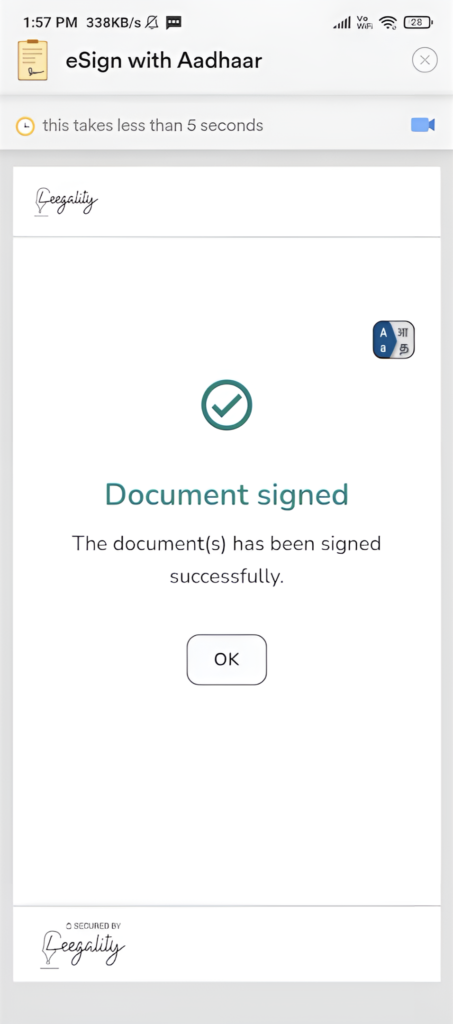
Step:-30 Document Signed.
- In a 1 or 2 Days your Demate Account will Be Open.
- Incase any Problem in your Account Opening Process Dhan Representitive will Contact you.
- After Press “OK”.
What documents do I need to open a Demat account with Dhan?
- Aadhaar Card or another valid ID proof
- PAN Card (Mandatory)
- Bank Account Details (Cancelled cheque or bank statement)
- Photograph or Selfie (Passport-sized photo)
- Signature on a blank paper (Scanned copy)
FAQ: How to Open Demat Account in Dhan | Dhan Demat Account Openning Step By Step
Are there any charges for opening a demat account with Dhan?
Dhan currently offers zero account opening and Maintenance Charge (AMC) charges.
Who do I contact if I face any issues during the account opening process?
If you face any issues, you can contact Dhan’s customer support via email or their in-app support feature for assistance. Email- help@dhan.co .
How can I track the status of my demat account application?
You can track the status of your application through the Dhan app or website. Log in with your registered mobile number and check the account opening status in the Accounts section.
What happens after I submit all my details and documents?
Once you submit all the required details and documents, Dhan will review your application. If everything is okay, your account will be opened within 24-48 hours, and you will receive your Demat account details via email.
What are the next steps after my Dhan Demat account is opened?
Once your account is opened, you will receive your Demat account number and other credentials. You can then deposit money into your account and start trading in stocks, mutual funds, ETFs and more.
Can I open multiple Demat accounts with Dhan?
No, Dhan allows only one Demat account per individual. However, you can have accounts with different brokers if needed.
READ MORE
-

Best Forex Funded Account Challenges in India | Ya Trader | Prop Trading Plateform
-

Best Forex Broker in India | Ya Markets
-

How to Open Account in Octafx | Octafx Account Openning Step By Step Guide
-
How to Open Demat Account in Dhan | Dhan Demat Account Openning Step By Step Guide

